| Latest topics | » Unitree Introducing | Unitree G1 Humanoid Agent | AI Avatar | Price from $16K  Yesterday at 9:11 pm by CANNER» Multiple solarstorms heading for EarthYesterday at 2:25 pm by CANNER» 1st Neuralink Patient’s Staggering Update Mon May 13, 2024 1:55 pm by CANNER» Festo BionicBee Thu May 09, 2024 2:28 pm by CANNER» MASSIVE Water 'Disturbance' DEEP in Southern Hemisphere of Earth!Wed May 08, 2024 2:22 pm by CANNER» Motion Extraction - Video EffectSun May 05, 2024 9:14 pm by CANNER» Global Auroras Light Up Mars!Thu Apr 25, 2024 9:27 pm by CANNER» Bird tells cat to shut up!Tue Apr 23, 2024 2:05 pm by CANNER» Jetson ONE - eVTOL Formation Flight PerformanceMon Apr 22, 2024 9:11 pm by CANNER» All New Atlas | Boston DynamicsWed Apr 17, 2024 1:37 pm by CANNER» Kerry Cassidy - Robert StanleyTue Apr 16, 2024 8:41 pm by CANNER» April 4th 2024 Peru Press Conference - Tridactyl Mummies - ENGLISH Wed Apr 10, 2024 1:44 pm by CANNER |
| | | 3D Peg Printer |  |
| | | Author | Message |
|---|
PapaLazarou
quake God

Posts : 403
Join date : 2017-01-11
 |  Subject: 3D Peg Printer Wed Nov 15, 2017 10:34 pm Subject: 3D Peg Printer Wed Nov 15, 2017 10:34 pm | |
| You can print all sorts of exciting things with 3D Printers! As well as pegs, and related paraphernalia of course...  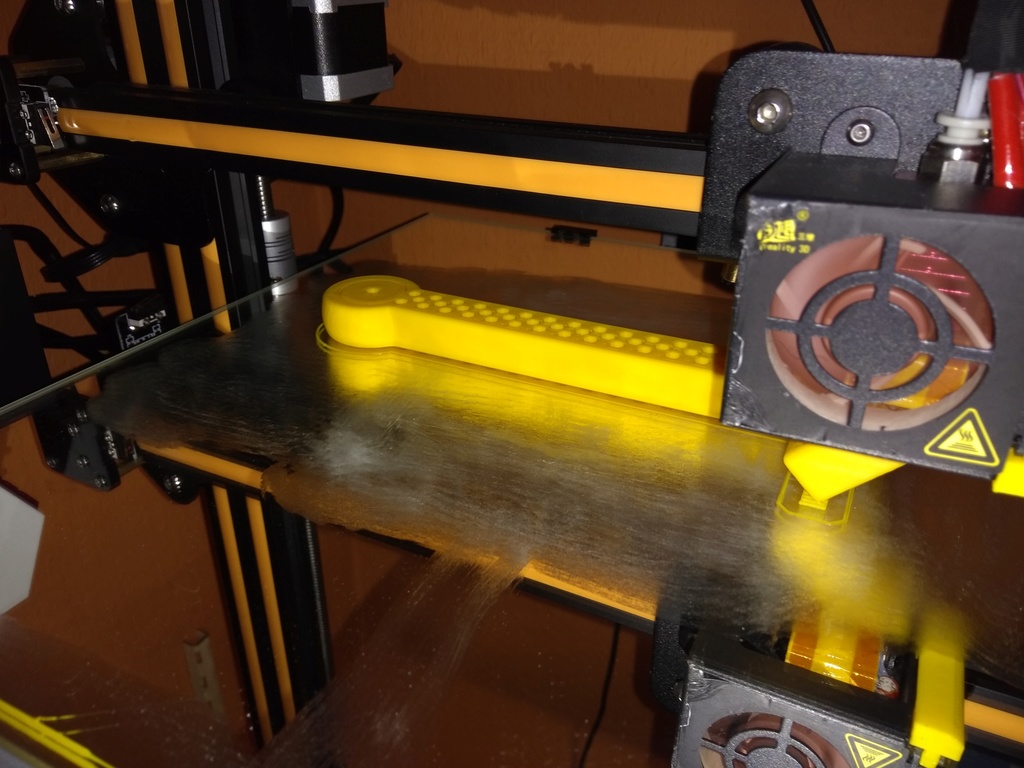 | |
|  | | muckyman
Admin

Posts : 6470
Join date : 2009-11-14
Age : 58
Location : Hull UK
| | Subject: Re: 3D Peg Printer Thu Nov 16, 2017 9:42 am | |
| It`s huge ! ooh Mrs  _________________  | |
| | | | CANNER
Moderator


Posts : 7032
Join date : 2013-04-30
| | Subject: Re: 3D Peg Printer Thu Nov 16, 2017 12:40 pm | |
| Whatever it is, it looks pretty good, coming straight out the printer. I remember from the beginning, when 3dprinting just started, things looking all layered and stripey needing lots of sandpapering to finish. But this thing looks ready for use. I'm still waiting with buying a 3D printer, though it must be awesome once you figure out how it all works.  | |
| | | | PapaLazarou
quake God
Posts : 403
Join date : 2017-01-11
| | Subject: Re: 3D Peg Printer Thu Nov 16, 2017 1:38 pm | |
| - muckyman wrote:
- It`s huge !
ooh Mrs Haha, yeh it's huge lol, it is actually not a 2 pound yellow ribbed nobbler or similar, it a filament guide for the printer.  The damn printer has had more things printed for it than me lol... Not only is it just a filament guide, it also has an in place printed ball and socket at the end, which I doubted would work well, but, it's perfect pretty much, it twists around in place inside the socket a full 360°, this would be impossible to manufacture normally. - CANNER wrote:
- Whatever it is, it looks pretty good, coming straight out the printer. I remember from the beginning, when 3dprinting just started, things looking all layered and stripey needing lots of sandpapering to finish. But this thing looks ready for use.
I'm still waiting with buying a 3D printer, though it must be awesome once you figure out how it all works. Hell yeh man, they've come a long way in a relatively short amount of time. It takes a bit of reading to grasp it all, then dial in all the settings properly so it prints as smooth as possible. So many parameters, but there's plenty of help, and I've got my head around most of it now. Sanding may still be neccessary depending on your needs but the quality is pretty spot on now, check this out, it's a single Hex drawer unit, which I've grabbed from Thingyverse, and heavily modded to basically make it work and join together properly including designing and printing heavy duty brackets. It looks as if the tolerance is too fine, but I want a tight fit, these do slide apart fairly easily even though they are a very very close fit. 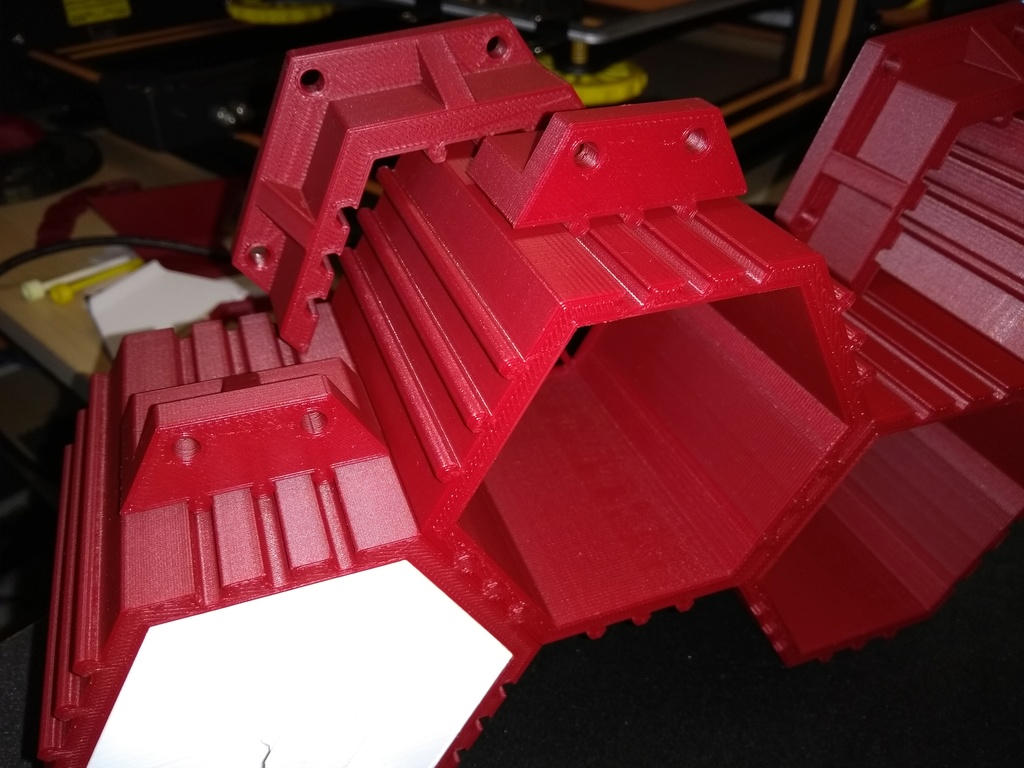 The quality of these units is superb. You won't ever get a mirror smooth finish there is a surface texture left from the way it prints, but this texture a result of the print resolution when it's accurately setup, this is only 0.2mm lines which you can feel when you run your fingers over it. I've designed the lugs to slide into each other with a very fine tolerance, they come out perfectly and need slight encouragement to engage together, a little more movement free it up slightly, so the final result is a snug fit so it hold itself together when on the wall... This is for a all my hardware and bits n pieces BTW, nut bolts, screws etc, I need more for all my quad stuff, the awesome thing is the more I need th emore I simply print... I've update my printer too with various mods to make it as accurate as possible, the main one being adding a second Vertical Z-axis screw, which is simply joined across the top of the printer with a belt, so one motor powers both sides, and pull the gantry up perfectly in synch. This also helps with maintaining a level bed for printing on, which is crucial, and must be 0.2mm away from the print head when it starts.. As you can see from this pic I have two vertical lead worm screws, the printer only come with one on the left hand side and the right hand side is kind of dragged upwards, this works well but can cause issues if your not clear on whats going on. The yellow bits I printed out, and bought the extra worm screw, belt, pulleys etc, and now it's pulled up perfectly parrallel without having to use two motors which can go out of sync as some people use. 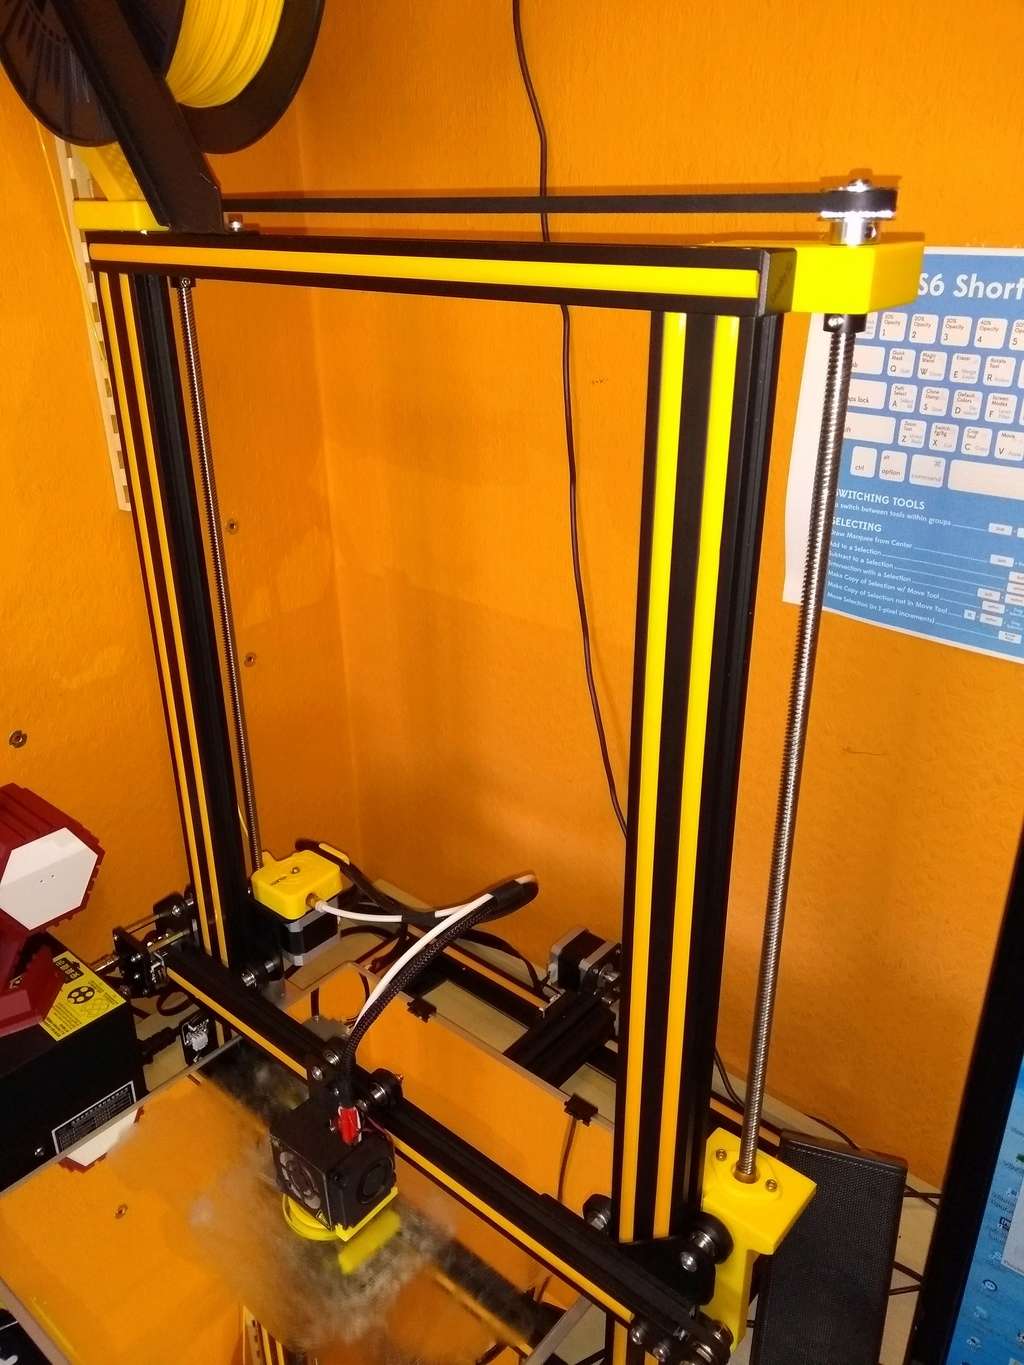 I love this thing, everything that come off it impress me, it freakin awesome! So, yeh, sorry I've been away from forums for a while, as you can see I've been a little busy... BTW, for the record it's a Creailty CR-10, 300mmx300mmx400mm(H), huge prints possible!!! cost around £300 ish. | |
| | | | CANNER
Moderator
Posts : 7032
Join date : 2013-04-30
| | Subject: Re: 3D Peg Printer Thu Nov 16, 2017 9:32 pm | |
| Ah so you had to do some serious modifying to the printer before you could make printings with consistent results. Good job, it seems to work perfectly, not sure I could do that.  Would love to have a 3D printer, but I want to have other things also.  | |
| | | | PapaLazarou
quake God
Posts : 403
Join date : 2017-01-11
| | Subject: Re: 3D Peg Printer Fri Nov 17, 2017 9:26 pm | |
| - CANNER wrote:
- Ah so you had to do some serious modifying to the printer before you could make printings with consistent results.
Good job, it seems to work perfectly, not sure I could do that.
Would love to have a 3D printer, but I want to have other things also. Cheers Canner, I'm pretty sure you could do this, knowing you've grasped building quads so well, the learning process is similar in some ways. I pretty much built it from two main parts, turned it on, installed the software to slice up a 3D object, and printed, the results were excellent. I did first take the settings for the slicer software for my printer from someone else, not knowing much about most of the settings and that stage. Now I know much about what those settings do, and how to change them to my liking depending on the print. 3D printers is one thing I've been keeping my eye on for a while, all it took was some decent heavy duty (Box aluminium), decenttly sized, realiable, cheaply made setup, like the Creality CR-10 to come along at a reasonable price. And here it is, in lots of ways outperforming printers far more pricey than this one. Out of the box this is one of the best printers for the money no doubt, and it can print excellent quality rivalling some costing much much more, we're talking vs some costing a grand or more. All I've done really is fine tune it slightly to be that much more accurate and reliable. It's now less hassle levelling the bed as the gantry that holds to extruder hot-end is pushed up on both sides. You can see from just a common sense point of view this would be more accurate and prone to less errors. I kinda worked all this out after lots of reading and realising where cheap improvements would have a good payoff... It's just like DIY quads really, it can be quite daunting before you dip you toes in, lots to learn, but once you understand a little, the rest comes flooding in as you grasp more and more and practice. It can turn into just a producer of junk of course, but can also come in very useful for very specific targeted things. Parts for quads to hold that odd shape thing on, covers for various bits, etc... Things that are broken are perfect candidates, my Dad's scooter has a trolly bag on the back I put on there. The cord lock clasp thing wouldn't tighten up and it kept coming undone, it's like a sprung clasp that two ends of think shoelace sized string go into, squeeze the button and slide the clasp along to close the bag. I simply designed the inner part again in Maya, took the old one apart and used what I'd printed, hey presto, fixed! And of course, I can now print as many pegs as my heart desires, lol.  | |
| | | | CANNER
Moderator
Posts : 7032
Join date : 2013-04-30
| | Subject: Re: 3D Peg Printer Fri Nov 17, 2017 9:59 pm | |
| - Quote :
- I'm pretty sure you could do this, knowing you've grasped building quads so well, the learning process is similar in some ways.
Maybe if I would put enough time and effort in it, I might get it to work. - Quote :
- Things that are broken are perfect candidates, my Dad's scooter has a trolly bag on the back I put on there. The cord lock clasp thing wouldn't tighten up and it kept coming undone, it's like a sprung clasp that two ends of think shoelace sized string go into, squeeze the button and slide the clasp along to close the bag. I simply designed the inner part again in Maya, took the old one apart and used what I'd printed, hey presto, fixed!
That's perfect.  Would be funny to adapt the nozzle so it can spray cookie dough or chocolate, that way you could print edible statues and figurines.  | |
| | | | Sponsored content
| | Subject: Re: 3D Peg Printer | |
| |
| | | | | | 3D Peg Printer | |
|
Similar topics |  |
|
| | Permissions in this forum: | You cannot reply to topics in this forum
| |
| |
| |